
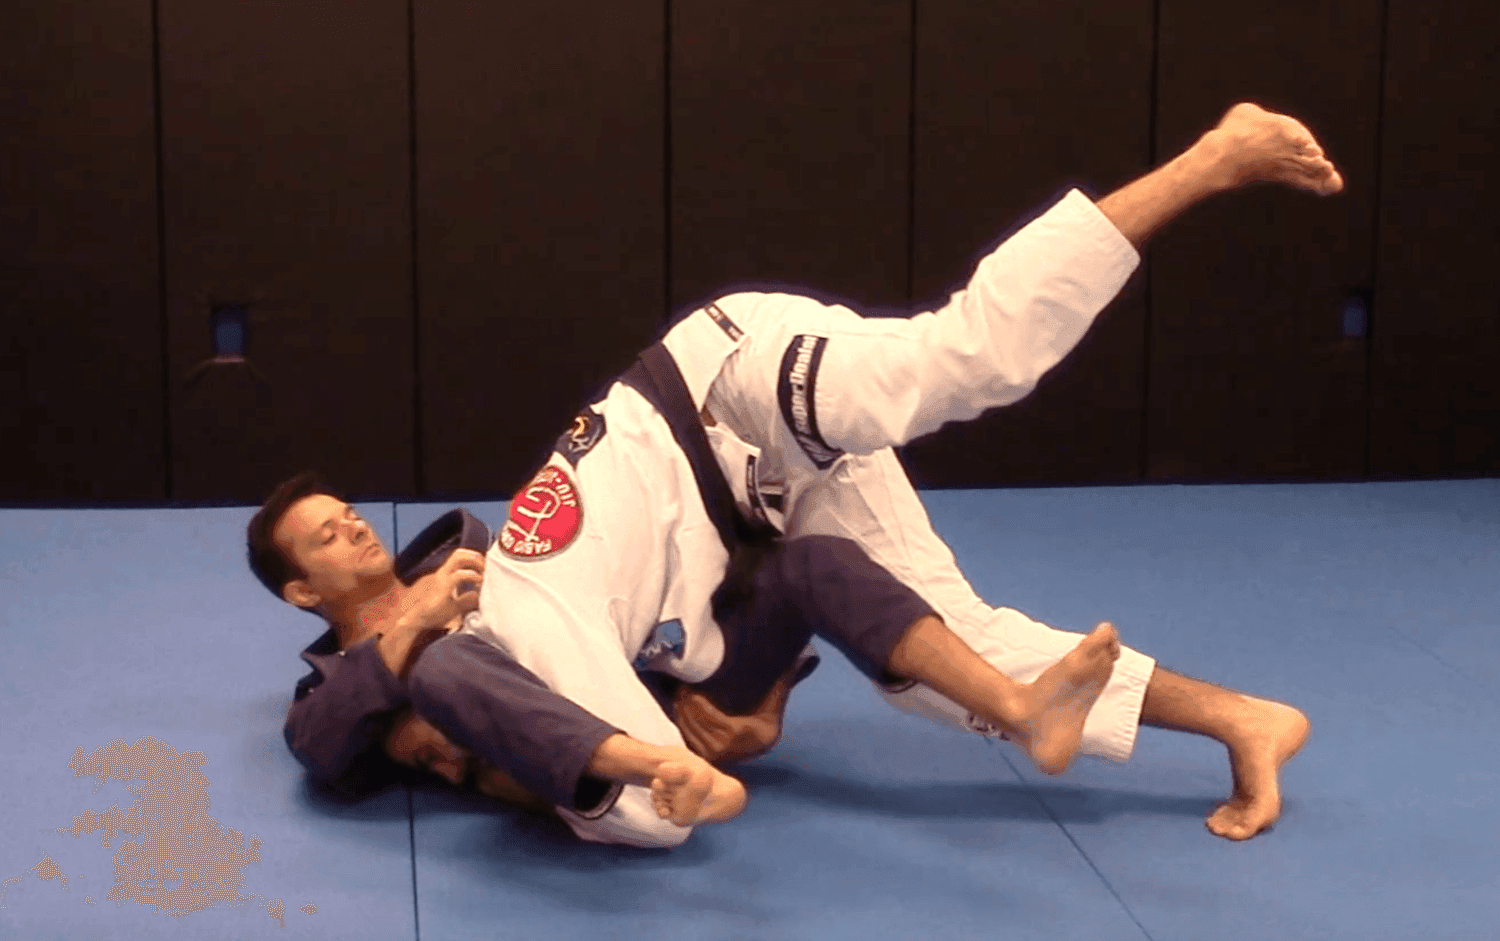
The over-under pass: fix the position before adding pressure
Quick answer: In an over-under pass, one arm works under a leg while the other controls the opposite leg from above. The useful pressure comes from a connected position that limits the guard player's movement, followed by a controlled transition past the legs. Practice the entry and the final upper-body connection separately before trying to force the whole pass through resistance.
Your arms are in the right-looking places. Your head is low. You have walked far enough around the guard that you feel you ought to be past it, yet a knee keeps appearing between your chest and your partner. Adding another minute of effort is unlikely to explain what went wrong.
The over-under rewards a closer inspection. Bernardo Faria's teaching gives several concrete details to look at, but a student still needs a way to test those details in ordinary class. Start with the point where control disappears, rather than declaring the entire pass unsuitable after one difficult round.
Name the two arms before choosing the direction
The name describes an arrangement: one arm beneath a leg, the other over the opposite leg. In Faria's 2019 demonstration, the legs are controlled separately while the passer works toward side control. The gi provides fabric grips; the exact handles change in no-gi.
Have your instructor identify the over-side arm and the under-side arm on your actual position. Then name the leg you intend to clear. This sounds elementary until two students spend ten minutes discussing opposite sides while believing they mean the same movement.
For the first repetitions, use one side. A right-versus-left explanation becomes much easier when both partners agree on the direction and do not switch midway through the demonstration. Learn the mirrored version after you can explain what each arm is doing.
Take a moment to inspect your partner's starting guard as well. An open position prepared for a drill is different from a live guard with grips already established. Do not confuse knowing the passing position with knowing how to enter it against every guard.
Treat the entry as its own round
Begin with the guard player seated or lying in the position your coach selects. The passer's only job is to reach the agreed over-under connection without being redirected. Stop there. The bottom player should tell you which part felt loose before you attempt to travel around the legs.
This is a proposed practice format, not a claim that there is one universal entry. Use it to separate two failures that otherwise look identical: losing the position before the pass begins, and losing it after you start moving.
Give the defender a narrow task at first. They might work only to square their hips or prevent one arm from connecting. Once the passer can recognize that problem, add another permitted response. A completely cooperative partner teaches the shape; a partner allowed to do everything immediately may make the cause of failure hard to identify.
Write down the starting position if you are comparing attempts across classes. Otherwise, a harder entry can look like a worse pass even though you are practicing a different problem.
The over-side elbow deserves an early check
In the Faria and Stephen Kesting troubleshooting lesson, the over-side arm stays tucked to limit access to a kimura. The same lesson discusses adjusting the leg's alignment before trying to clear it. These are positional details, not instructions to squeeze harder indefinitely.
For your practice round, pause when the bottom player gains access to that arm. Let the instructor see the position before either partner scrambles out of it. A stopped example is easier to correct than a verbal description of a grip that disappeared twenty seconds ago.
Do not make the defender finish a shoulder lock to prove that the opening exists. Agree that a clear, controlled catch ends the repetition. You are studying the pass, so a safe reset gives you the information you came for.
If keeping the elbow close seems impossible with your current grip, ask about the grip rather than treating the discomfort as a toughness test. There may be a version or an entry better suited to the position you have actually reached.
Pressure should let you move without losing the connection
Faria's troubleshooting lesson also discusses turning the hips slightly rather than remaining square. The point is to change how weight reaches the bottom player. That is more specific than the instruction to be heavy, which tells a student very little about what to adjust.
Ask your partner to distinguish pressure from pain. They should be able to stop the repetition immediately, and you should be able to remove your weight without falling or wrenching a limb. If the only way you can reproduce the movement is with a sudden drop, slow down and get the position checked.
Use small changes while the instructor watches. Change the hip angle, repeat, then compare. Changing every grip and both feet at once may produce a successful repetition without telling you which adjustment mattered.
Our guard-passing guide covers the wider problem of moving past a guard. Here, keep the investigation local: which connection remains as your body moves, and which one disappears before the bottom player's knee returns?
Getting around the feet is only the first finish
An apparent pass can end with both players still scrambling for the upper body. Faria's troubleshooting material addresses this gap by changing grips after the legs are cleared, including a pants connection and control near the arm to open a route into side control. Have your coach demonstrate the version used in your class.
Then give the final position its own practice time. Start just beyond the legs with the defender's frames in place. The passer tries to settle; the defender tries to recover guard or face the passer. Stop when either task is clearly achieved.
This is where a stopwatch can mislead you. Getting outside the legs quickly does not mean you have secured the position. In a learning round, judge whether you can remain connected when the partner begins moving again.
Do not release both leg controls merely because you have reached the side. Ask which hand changes jobs first and what prevents the defender from reclaiming the space during that change. That answer should be visible in the demonstration, not left as a vague instruction to hold on.
No-gi needs its own grip rehearsal
Faria's no-gi demonstration replaces cloth handles with body connections, including hugging the under-side leg and controlling the other shin. It also emphasizes the transition into chest-to-chest control once the legs are cleared. Those changes deserve practice of their own.
Begin from the agreed position without pretending your partner is wearing pants you can grab. Identify where each hand can legally and reliably connect under your training rules. If you keep reaching for fabric that is absent, reset before continuing the pass.
Keep the first repetitions controlled. A demonstration may show an assertive entry; a new student does not need to reproduce its speed to understand the grip arrangement. Ask for a slower entry or a prepared starting position while learning.
The gi versus no-gi guide explains the broader equipment difference. For this pass, test it directly: remove the cloth grip from your familiar version and ask what now keeps the leg from slipping free. Do not answer by grabbing your partner's fingers or clutching clothing your class rules prohibit.
Give the defender a job that produces useful feedback
A partner who lies still through every repetition can help you remember the sequence. They cannot tell you much about whether the connection survives an attempt to escape. Add resistance in a way that makes the result interpretable.
Try this short progression with the instructor's agreement:
First, the defender checks whether they can recover the space without using their hands.
Next, allow a normal frame while keeping the pace slow.
Then allow a controlled attempt to square up or recover guard.
Finally, practice the entry and finish together at the agreed intensity.
These are suggested constraints, not a required curriculum. Change them if they do not fit the particular version you are learning. The point is to know what the defender was allowed to do when the pass failed.
Switch roles before either person gets tired of being pinned. The bottom player's account is useful information: perhaps they could move freely until one grip changed, or perhaps the passer's pressure was unpleasant without actually stopping the escape. Listen to that difference.
Our BJJ drilling guide explains how to connect a specific assignment like this to the less predictable work of ordinary rounds.
Keep one failed repetition instead of collecting ten more passes
After a difficult round, record a short note: where the attempt started, what the defender did, and where your connection broke. Avoid writing only that the over-under did not work. That is a verdict, not a description a coach can inspect.
Bring one question to the next class. If you lost the arm, ask about the elbow and grip. If you cleared the legs but lost side control, begin the next practice round at that transition. If you never reached the position, ask for an entry suited to the guard you faced.
Give yourself permission to abandon an attempt during live training. Rebuilding your passing position is a reasonable response when the connection is gone. Hanging on to the name of the technique does not restore the missing grip.
Keep the training sample modest. A few attentive repetitions with an honest defender can produce a clear question. A long, tired struggle may leave both people remembering only that the top player pushed hard and the bottom player wanted the round to end.
Main photo: BJJ Fanatics / Bernardo Faria demonstration.
The takeaway
The over-under is easier to troubleshoot when you split it into the entry, the movement past the legs, and the connection to the upper body. Use Faria's demonstrations to identify the details, then let a coach check those details on the version you are practicing.
If more pressure is your only answer, pause the round. Find the first place the defender recovers freedom and start there. The next useful repetition might begin halfway through the pass rather than at the slap and bump.
Find a class with time for positional practice
Use the gym directory to explore local academies and ask how their classes combine demonstrations, drilling, and supervised positional rounds.
FAQ
Why is it called the over-under pass? The name refers to the arms: one goes beneath a leg while the other controls the opposite leg from above. Ask your instructor to identify each side before following a directional explanation.
Why do I get caught in a kimura while passing? An exposed over-side arm is one problem addressed in Faria's teaching. Stop at the opening and have a coach inspect your grip and elbow position; do not force your way through a controlled shoulder-lock catch.
Does the over-under work without the gi? There are no-gi versions, including Faria's published demonstration. They replace cloth handles with body connections, so rehearse those grips rather than assuming the gi version transfers unchanged.
Should I use more weight when the pass stalls? First check the connection and the route into the final position. More effort does not identify a missing grip, and discomfort alone does not mean the defender's movement is controlled.
Related Posts
Lasso guard: know when to keep the sleeve and when to leave
A lasso hook can buy time or trap you in a grip battle. Give the free leg a purpose, keep useful sleeve control, and recognize when to change guards.
Spider guard: give each foot a job
Make spider guard easier to read. Learn how sleeve tension, different foot positions, and the passer's posture shape your next sweep or transition.
The seated arm drag starts before you pull the arm
The seated arm drag needs more than a wrist grip. Study the arm connection, hip movement, and reactions that open a back take or a route to top position.
Comments (0)
Loading comments...