
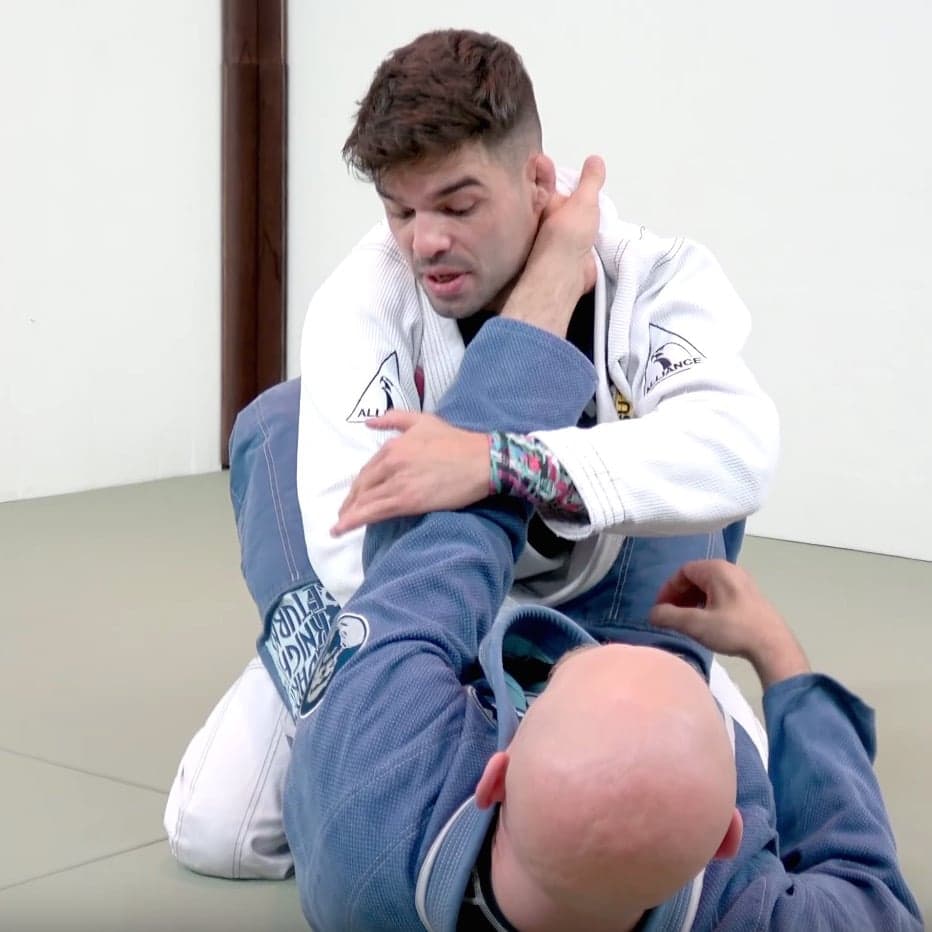
Standing up inside closed guard without giving away balance
Quick answer: Before standing inside closed guard, address the grips that are controlling your posture and learn which leg to raise first in your chosen variation. Treat opening the ankles and passing the legs as separate tasks. Rehearse a controlled return to the mat as well as the successful guard break.
Both hands are on the jacket. You finally get a foot underneath you, begin to stand, and immediately discover that your partner has been waiting for precisely that step. Back to the knees. The round becomes a series of false starts.
Standing is a reasonable answer to closed guard, but “stand up” leaves a lot unsaid. Which arm can reach your leg? What is stopping the opponent from pulling your chest down? Where are you going once the ankles separate? Those questions deserve time before the instruction becomes louder.
Separate opening the guard from passing it
Closed guard creates an obvious obstacle: the opponent's legs remain connected around you. Opening that connection changes the position. It does not automatically put you beyond their legs or establish a pin.
Stephan Kesting makes that distinction in his discussion of standing and kneeling passes, published in March 2018. He separates the method used to open closed guard from the method used to pass afterward. A standing break can lead to a lower passing position; a kneeling break does not obligate you to remain on your knees.
That is useful freedom, especially if you have been treating the whole exchange as one prescribed movement. You can work on getting upright without simultaneously learning every open-guard pass. Later, you can connect the break to a pass you already understand.
For now, ask your coach to name the finish of the opening exercise. Is it enough to separate the ankles while staying balanced? Do they also want you to establish a particular leg control? A precise endpoint makes it easier for both partners to know when a repetition succeeded.
Find out what the opponent's collar grip is doing
A deep collar grip deserves attention before you begin rearranging your base. The grip itself may be visible, but the more useful observation is what it allows the person on bottom to change about your posture.
In the closed-guard lesson featuring Thomas Lisboa, published by Grapplearts in 2020, grip management comes before the standing opening. The lesson presents several grip-breaking options instead of assuming the top player begins with unopposed hands and a straight spine.
Use that order in your own practice. Start with the collar grip that actually causes trouble and ask your instructor to select a suitable response. Do not practice the rise from a cooperative position, fail against a firm grip, and conclude that standing is the problem. You changed the starting conditions.
Your partner should also know the task. If the exercise is about preserving posture while you prepare to rise, let them try to disrupt it in the agreed way. Save unrelated submission chains for the next stage. That keeps the first exchange readable without pretending the opponent will always cooperate in a full round.
The first leg should fit the grip arrangement
Lisboa's demonstrated sleeve-control variation connects the choice of first stepping leg to the arm being controlled. The aim is to deny that arm easy access underneath the rising leg. This is a specific example, not a universal instruction to stand with the same foot first regardless of your grips.
Have your coach check the version you are learning from both sides. Say which hand controls which sleeve before moving. It sounds fussy until you discover that you memorized a left-right sequence without understanding why the instructor chose it.
Then change the starting grip and stop before standing. Ask whether the same first step still makes sense. You do not need to improvise a solution. You need to notice that the question changed.
A partner who releases the sleeves and leaves both arms on the floor is helping you rehearse the movement, but they are not testing the grip decision. Keep those two uses of drilling separate. There is room for both, particularly when the act of getting a foot underneath you is still awkward.
Rising with someone attached is a partner exercise
Practice the rise slowly enough that the person on bottom can follow what is happening. They should not be surprised by a sudden lift, and you should not be surprised when they stop supporting the position you expected.
Ask the instructor how to return safely if the opening fails. A controlled descent or reset belongs in the lesson, particularly for students who have not spent much time standing with a closed guard attached. Do not drop a partner or attempt to bounce them loose.
You can begin with a lower endpoint, such as organizing the first step and pausing for a correction, before attempting the full rise. That is a practice adaptation to discuss with the coach. It does not need to become a rule that everybody follows for a certain number of classes.
Leave enough room around the pair. A standing exercise squeezed between two groups doing ground escapes creates a spacing problem before either person makes a technical mistake. If the class does not have appropriate room, ask to work on the preparation and save the standing portion for a supervised area with space.
Do something sensible when the ankles separate
The opening is easy to admire because it took work. Try not to admire it for long. The person on bottom can now reorganize their legs, and you still need to decide how to begin passing.
Choose one continuation with your coach. It might lead into a passing position you already use, rather than a new sequence selected because it looks good in a demonstration. The first requirement is that the hand and foot positions at the end of the break fit the beginning of the pass.
Start a separate practice block with the guard just opened. Ask the bottom player to establish their preferred open-guard connection while you try to obtain your agreed passing start. This exposes the pause between the two tasks without requiring you to repeat the whole standing break every time.
Our guard-passing guide provides a broader introduction. For this session, keep the question small: once the ankles separate, what does your free hand do? If the answer changes with the opponent's reaction, have the instructor show you how to recognize that reaction rather than memorizing a blind reach.
Notice whether you failed before standing or after it
Two failed repetitions can look alike from across the room and need different corrections. One ends because you could not get your posture organized. Another gets you upright, but you lose balance while changing a grip.
Sort your notes by the point where the exchange broke:
Before the first step: the opponent still controlled the posture you needed to change.
During the rise: the grip or base did not support the movement you attempted.
After standing: you could not organize the opening without losing balance.
After the break: you paused or reached in a way that gave the opponent a useful guard.
These are categories for describing practice, not a diagnosis of every possible failure. Show the instructor a repetition from the category that keeps recurring. Do not ask for a different pass when you have not yet reached the passing position.
If you have permission to film, frame the shot so both feet and the bottom player's hands remain visible. A video of only your upper body can make the decisive movement impossible to inspect.
Standing is an option, not a loyalty test
Some students find a particular kneeling break easier to organize at first. Others prefer to stand. That preference can guide what you practice without turning the alternatives into rival camps.
Kesting's standing-versus-kneeling article describes trade-offs rather than declaring one method appropriate for every position. Keep that spirit when discussing the choice with your own instructor. Your current grips, experience, and the opponent's reactions should have more influence than an argument about what a serious grappler is supposed to prefer.
Spend enough time on the chosen version to give it a fair test. Changing the entire method after every failed round makes it hard to discover a correctable detail. At the same time, do not force an uncomfortable position simply to prove that the method must fit you.
Bring a clear report back to the coach: you can stand from the cooperative start, but lose the sleeve when the opponent resists. That gives them a teaching problem. Saying you are “just bad at standing breaks” offers much less information and may keep you working on the wrong part of the sequence.
Main photo: Grapplearts / Thomas Lisboa closed-guard lesson.
The takeaway
The standing guard break begins before either foot leaves the mat. Work out the grip problem, learn why your first step belongs on a particular side, and include a controlled reset in the practice. Once the guard opens, have a passing start ready to study next.
You do not need to learn an entire passing system in the same lesson. Find the stage that keeps failing and give it a clear exercise. If your posture disappears before you rise, start there. If you get upright comfortably and then hesitate when the ankles open, spend the next block on that transition.
Learn the rise with someone watching
Find beginner-friendly BJJ classes near you and ask how the academy introduces guard openings. Confirm the class format directly, and have an instructor check your version before practicing standing breaks at open-mat speed.
FAQ
Must I stand to open closed guard? No. Standing and kneeling methods both exist. Learn a version appropriate to your experience and the position, then connect it to a passing option. The method used to open the guard does not dictate your height for the entire pass.
Which foot should come up first? It depends on the grips and the variation being taught. In the sleeve-control example discussed here, the first step is related to the arm being controlled. Have your coach demonstrate the choice from both sides instead of memorizing a direction without its reason.
Is opening the ankles the same as passing guard? No. The opponent can still use their legs to control distance and create another guard after the ankles separate. Practice the next connection as a separate task, then join the two parts once you understand them.
What should I do if I cannot stand safely? Stop and ask the instructor to adjust the exercise or teach another approach. Do not force a painful position, lift unpredictably, or drop the person holding guard. Learning the preparation and the controlled reset is worthwhile practice too.
Related Posts
De la Riva guard: make the standing passer take a step
Your de la Riva hook is in, but the passer is comfortable. Study ankle control, the free leg, and the balance reaction that makes an attack possible.
Lasso guard: know when to keep the sleeve and when to leave
A lasso hook can buy time or trap you in a grip battle. Give the free leg a purpose, keep useful sleeve control, and recognize when to change guards.
Spider guard: give each foot a job
Make spider guard easier to read. Learn how sleeve tension, different foot positions, and the passer's posture shape your next sweep or transition.
Comments (0)
Loading comments...