
Your knee shield needs a plan for the space it creates
Quick answer: Use the knee shield to manage a specific distance, then choose what you intend to do from it. The height of the shield matters, but so do your upper-body connections and the passer's angle. Practice one transition out of the shield and one response to the way your partner usually tries to clear it.
A knee across the torso can make bottom half guard feel less urgent. That is welcome. It can also become a place where you wait, convinced that holding the same shape for another minute must eventually create an attack.
The shield has bought you a position to work from. The next question is what you intend to do with it. Coming up for an underhook, recovering another guard, and attacking an arm are different assignments. Choose one before a passing attempt chooses the rest of the round for you.
Control the distance instead of maximizing it
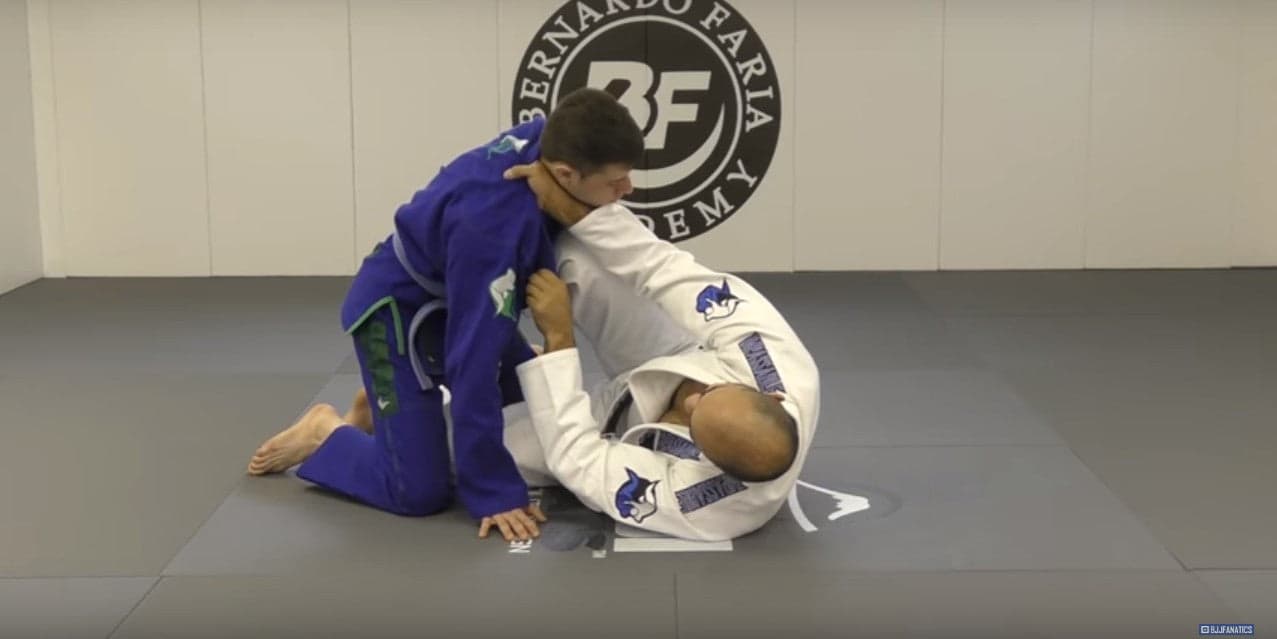
In Bernardo Faria's January 2019 knee-shield lesson, the diagonal shield works with a collar grip and a biceps frame. The explanation emphasizes controlling the space between the players rather than merely creating the largest possible gap.
That distinction is useful during practice. Ask what distance the next action requires. If you want to come up and connect to the opponent, repeatedly pushing them farther away may not help you reach that particular destination. If you need to recover a leg position, a different amount of space may be appropriate.
Start from the coach's full setup and have the partner apply gentle forward pressure. Check what stops that pressure and which parts of the position remain free to move. Do not judge the shield only by whether it feels strong while both people stay still.
The half-guard introduction covers the broader position. This session is about the interval between having a shield and using the space it gives you. Try to make that interval something you can describe.
High and low shields are different configurations
Do not assume every instruction about a knee shield refers to the same placement. A higher diagonal shield and a lower, more horizontal arrangement can appear in different lessons, each with supporting details.
The February 2019 Z-guard lesson featuring Craig Jones distinguishes its lower, more horizontal knee position at the hip from a higher knee-shield arrangement. That is a description of the version being taught, not a verdict that one configuration should replace the other.
When a correction seems to contradict something from another class, recreate both complete setups. Ask which upper-body connection belongs with each and what the top player is doing. You may find that the instructions solve different problems.
Avoid mixing the knee height from one version with a hand placement remembered from another before you understand either. That combination might be useful eventually, but initially it is an experiment. Begin with a complete position you have actually been shown and identify what you are changing when you depart from it.
Your hands still have work above the shield
A knee shield does not give your arms the rest of the round off. Watch how the instructor manages the opponent's upper body while the leg controls distance.
Faria's February 2019 teaching roundup includes collar and arm control alongside the shield. In a two-on-one variation, the arm connection helps clear a route toward the leg. The upper-body work contributes to an attack rather than simply waiting behind the knee.
For your own practice, spend a repetition watching only the hands. Notice which contact is maintained while the other changes. Then have the partner begin the grip sequence they normally use to pass your shield. Stop before the pass and identify the first useful connection they obtain.
This is a more precise question than asking why the knee is weak. You may have preserved the leg frame while allowing the opponent to improve everything above it. A change in hand position could be relevant, but have the instructor diagnose the actual exchange rather than choosing an answer from the name of the guard.
Pick a transition that gives the shield an endpoint
For a first attacking route, the two-on-one can give you a clear task to study. In Faria's February 2019 arm-control lesson, wrist and elbow control move the opponent's arm across and create a route toward a single leg. The lesson also discusses other continuations.
You do not need all those continuations at once. Select one with your coach and identify when the shield stops being the main distance-control tool. What replaces it as you move closer? Which arm connection must remain while your torso rises?
Start the repetition immediately before that transition. If it works cooperatively, reconnect it to the initial grip exchange. This lets you distinguish a problem obtaining the two-on-one from a problem moving after you have it.
Keep the partner's role honest. They can offer the prescribed arm position while you learn the movement, then begin trying to recover it. Label those as different stages of practice. A successful repetition against a provided grip does not yet tell you how to obtain that grip during a live round.
Notice when the passer changes the angle of the problem
A passer can work around the shield instead of driving directly through it. Your knee may feel solid against the first line of pressure and much less useful after the opponent moves elsewhere.
Lachlan Giles's March 2019 knee-shield passing lesson includes different approaches for different shield arrangements. One option returns toward a central position; others change the hip angle or address a high versus low shield differently.
Use that lesson to ask a practical question from bottom: where did the passer go before your frame stopped helping? Recreate the movement slowly and compare the starting angle with the one immediately before the pass. Your response may require moving with the partner or changing the guard, not simply bracing harder in the original direction.
Work with the pass people actually use against you. If the recurring problem is an arm weaving through your legs, study that exchange. If it is being flattened by a circling movement, start there. The same broad complaint about losing the knee shield can describe several distinct passing problems.
Changing the shield can preserve the guard
Once you have chosen an exit, practice using it before the knee is completely cleared. This gives you a chance to recognize a change while you still have options.
For example, ask your instructor to show a recovery into another familiar guard when the passer begins their usual clearing action. Identify the connection that remains during the change. Your task is to leave the original configuration deliberately, not to wait until the pass is nearly finished and then throw the legs in every direction.
Do not treat the recovery as a consolation prize. It is a different assignment from sweeping, and it can be tested directly. Agree on what counts as a usable recovered guard, then let the partner resume moving gently to check it.
If the recovery repeatedly ends with you facing away or disconnected, study the arrival. You may be solving the first passing problem while creating another. That does not make the initial movement useless, but it means the repetition has an unfinished section. Keep that section visible in your notes instead of calling every change of position a successful escape.
Make a small test out of the next half-guard round
Give your positional work a start and a finish. A round in which the top player must smash forward and the bottom player must hold the same knee position tells you little about changing angles or leaving the shield.
Try a more specific agreement:
Begin in the exact shield configuration taught in class, including the hand connections.
Bottom can attempt the selected transition or the selected guard recovery.
Top uses one familiar clearing method at a pace both players can follow.
Reset after the transition reaches its agreed endpoint or after the pass is completed.
Switch roles so each person can feel what the other is trying to remove. Later, add another passing response. There is no fixed number of rounds required; the format is a suggestion for making the problem easier to inspect.
End with one observation about the first change that mattered. Perhaps the opponent moved your upper hand before the knee collapsed. Perhaps your shield held, but you never found a route into the attack. Those are different notes, and they should produce different questions at the next class.
Main photo: BJJ Fanatics / Bernardo Faria knee-shield lesson.
The takeaway
A knee shield is useful because of the distance and choices it creates. Learn its complete configuration, including the hands, then choose one action that gives the position an endpoint. A shield you can hold but cannot leave deserves as much study as one the passer clears immediately.
When the position breaks, watch the opponent's angle and the order in which connections disappear. The correction may involve the knee, but it may begin somewhere else. Keep the failed exchange specific enough that an instructor can help you test an answer.
Bring your recurring half-guard problem to class
Find BJJ gyms near you and ask about coached positional training. Show the instructor the pass that repeatedly clears your shield, including the grips and angle that come before it.
FAQ
Should my knee shield be high or low? Both configurations appear in instruction, with different supporting details and uses. Begin with the complete setup your coach teaches. Compare versions in context instead of treating knee height as a universal right-or-wrong choice.
Why does my knee shield collapse against pressure? The cause may involve its placement, a lost upper-body connection, or a change in the passer's angle. Have someone watch the first adjustment that weakens the position. More force from the leg is not automatically the appropriate answer.
What should I attack from knee shield first? Pick one route with your instructor. The two-on-one toward a single leg is one example discussed here. Learn its grip requirements and endpoint before adding a long collection of unrelated attacks.
Is recovering another guard a successful use of the shield? It can be, if that is the task and the new guard is usable. Test the arrival instead of counting any movement away from the original position as success. Guard recovery and sweeping are different skills worth practicing separately.
Related Posts
Lasso guard: know when to keep the sleeve and when to leave
A lasso hook can buy time or trap you in a grip battle. Give the free leg a purpose, keep useful sleeve control, and recognize when to change guards.
Spider guard: give each foot a job
Make spider guard easier to read. Learn how sleeve tension, different foot positions, and the passer's posture shape your next sweep or transition.
The seated arm drag starts before you pull the arm
The seated arm drag needs more than a wrist grip. Study the arm connection, hip movement, and reactions that open a back take or a route to top position.
Comments (0)
Loading comments...