
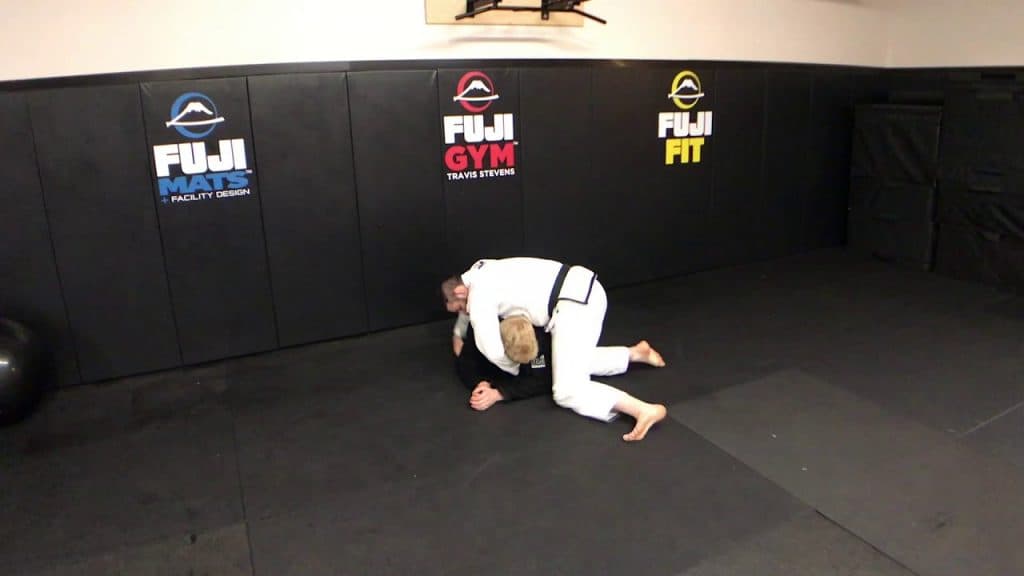
Front headlock control before the submission
Quick answer: Treat the front headlock as a position you must hold through movement before you commit to a submission. Watch the opponent's posture and arm position, along with where your own head and weight sit. Practice reaching a useful next position without requiring a choke on every attempt.
The head is under your arm. Both hands connect. You sit, squeeze, and discover that the opponent's head has already escaped. Now you are on your back, looking up at someone who is starting a guard pass.
For this hypothetical round, the mistake happened before the squeeze. You traded a position on top for a finishing position you had not secured. The front headlock deserves its own practice time, including exchanges in which nobody applies a choke. Otherwise, every lesson gets reduced to whether your forearms were strong enough.
Start with the position you actually reached
A front headlock can appear after a snapdown, a defended shot, or a transition on the floor. Travis Stevens covers those entry contexts in his BJJ Fanatics demonstration. He begins his control sequence with weight over the upper back, a chinstrap, and control behind the triceps. Those details give you more to inspect than the existence of an arm around a neck.
An entry from standing and an entry against a kneeling partner should not be treated as identical snapshots. Before repeating the move, recreate the starting posture from the demonstration you are studying. Is the partner on both knees? Is a hand supporting their weight? Where is the arm you intend to control?
If you skip those questions, you may be asking a grip to solve a problem it was never shown solving. The useful correction might be restoring the starting position rather than adding another guillotine variation to your notes. Put the finish aside until you can explain what is keeping the head and shoulder within reach.
The snapdown has a direction, not just a downward pull
John Danaher's side snapdown lesson starts with inside arm position and develops a collar tie with triceps control. The head and arm are moved in opposing directions to disturb the opponent's alignment. If the opponent recovers, the action can be redirected to the other side. That is a specific entry rather than permission to pull harder on someone's neck.
For practice, separate winning the tie from completing the snapdown. Start upright and let your partner deny the inside position at a manageable pace. If you never establish the tie, record that as the failed step. Do not count a wild reach around the head as successful setup just because your fingers touched.
Then rehearse the transition to the floor with your instructor's guidance and enough clear mat space. Arriving in a front headlock should not depend on crashing into another pair. If the room is crowded, begin from the kneeling position and save the standing entry for a suitable session. The entry still matters; it simply does not have to be forced into every available square foot.
Your head position is part of the control
Danaher's centerline demonstration addresses moving his head from one side of the opponent's centerline to the other as the attack changes. The lesson connects that movement to limiting an escape and creating room for the attacking arm. It is a useful reminder that the instructor's head is not merely somewhere convenient for the camera.
Pause a demonstration before the hand adjustment, then after it. Mark where the head was in both frames. If those positions differ, include the movement in your rehearsal instead of copying only the hands. A phone note that says “new grip” can erase the most relevant part of the lesson.
Avoid turning that observation into a universal instruction to put your head on a particular side. Different attacks and responses require different arrangements. Name the variation you are practicing. If your training partner circles in a direction you did not expect, stop and work out whether you are still in the same position before trying to finish it.
Keep the opponent's arm in the picture
It is easy to crop a front-headlock problem down to the neck. That can make a technical demonstration look simpler than it is. Stevens's starting triceps control, for example, belongs in the setup even if the eventual submission is the most memorable part of the video.
Try describing a failed exchange without using the word slippery. Perhaps the opponent's elbow moved out, they changed their base, and the head followed. Perhaps your supporting hand left its first job before your other control was ready. Those are testable descriptions. A complaint about sweat gives you no next step.
A simple review can use two observations:
Identify which of the opponent's hands or elbows moved first.
Identify what your free hand was doing at that moment.
You are not trying to stop every limb simultaneously. You are finding the particular movement that dismantled the position you thought you had. Ask a partner to reproduce that movement slowly, then check the response with your instructor. It is easier to correct one missing connection than to repair an entire fast scramble from memory.
Going behind deserves the same attention as the choke
BJJ Fanatics' front-headlock overview presents the position as a way to create both submission opportunities and positional advancement. That broader purpose is worth keeping in your practice. If the only acceptable result is a guillotine, you can miss a perfectly useful opportunity to move behind the opponent.
Choose a go-behind your coach has already taught and practice it from the same headlock start as your submission entry. Do not improvise a spin around a partner whose neck is fixed in place. First learn how your controls are supposed to change as you move.
Make the end position explicit. Touching the opponent's back with your chest is one checkpoint; remaining behind when they begin to turn is another. In a practice round, you can stop at either checkpoint, provided both people know the agreement. Calling the movement a back take before you have established control can conceal where the exchange still needs work.
If the opponent turns to face you and recovers guard, continue with a passing position you understand. You have changed phases. Hanging onto a stretched headlock out of frustration does not put you back at the start.
A sitting finish needs a reason
Stevens demonstrates a sit-through option in his anaconda sequence rather than requiring a roll in every attempt. That is a useful example of an instructor choosing a particular route to the next position. It does not mean every headlock should end with sitting to the mat.
Before adding a sitting or rolling attack, ask your coach to identify the controls that must survive the movement. Then rehearse the transition without finishing pressure. If your partner can remove their head before you arrive, return to the transition. More force at the end cannot repair a connection that disappeared halfway through.
This is also where a video angle can mislead. The arm behind the opponent may be doing work you cannot see. Use another view if one exists. If it does not, bring the uncertainty to class instead of manufacturing an explanation from the visible hand alone.
For live rounds, give yourself permission to remain on top. A submission attempt is a choice, and it should fit the position in front of you. You do not owe the room a dramatic finish because you briefly caught a head.
Give a practice round a narrow ending
Here is one possible practice format to discuss with your coach. Start in an agreed kneeling front-headlock position. The attacking player tries to maintain a useful connection and reach the taught go-behind. The defending player tries to free the head or recover a facing position. Leave submissions out of the first round so the position gets some uninterrupted attention.
Reset as soon as one of those outcomes occurs. A long continuation into unrelated guard play makes it harder to get repeated exposure to the starting problem. After several attempts, switch roles; the view from underneath may reveal a gap the attacking player could not feel.
If both partners can manage the movement calmly, add one familiar submission entry in a later round. Stop at the catch or use gentle finishing pressure only under the normal rules of your class. Tap early and release immediately. Never use a partner's tolerance for neck discomfort as the test of whether your control improved.
Our guide to drilling BJJ with a purpose covers ways to organize practice. Here the important choice is the reset: it should happen while you can still remember exactly which connection changed.
Main photo: BJJ Fanatics.
The takeaway
The front headlock contains a set of decisions before it becomes a submission. How you arrived, which arm you control, and how your head moves all belong in the review. A failed finish may be the first moment you notice the problem, but it does not have to be where the problem began.
Spend part of the next session keeping the position and reaching a taught go-behind. Add the choke after you can account for the transition. If you consistently lose the head during that transition, you now have a specific exchange to show your instructor instead of another complaint about grip strength.
Find a class with room to work on transitions
Browse nearby BJJ gyms and check their class schedules. Ask about no-gi instruction and opportunities for supervised positional practice before planning a visit.
FAQ
Is a front headlock the same thing as a guillotine? A front headlock is a controlling position that can lead to a guillotine or another outcome. Having an arm around the head does not by itself establish a finished choke.
Should I always sit down when I catch the head? No. Practice the controls required for your specific finish, and keep a taught positional option available. Sitting without those controls can leave you on bottom after the head escapes.
Can I practice the position without choking my partner? Yes. Agree on a positional goal, such as freeing the head or reaching a taught go-behind, and reset there. This is a suggested training format, not a requirement for every class.
What should I record after a failed attempt? Note the first hand, elbow, or head movement that changed the position, along with your own grip at that moment. A precise description gives your coach something to inspect; a total count of failed guillotines does not explain the failure.
Related Posts
Lasso guard: know when to keep the sleeve and when to leave
A lasso hook can buy time or trap you in a grip battle. Give the free leg a purpose, keep useful sleeve control, and recognize when to change guards.
Spider guard: give each foot a job
Make spider guard easier to read. Learn how sleeve tension, different foot positions, and the passer's posture shape your next sweep or transition.
The seated arm drag starts before you pull the arm
The seated arm drag needs more than a wrist grip. Study the arm connection, hip movement, and reactions that open a back take or a route to top position.
Comments (0)
Loading comments...